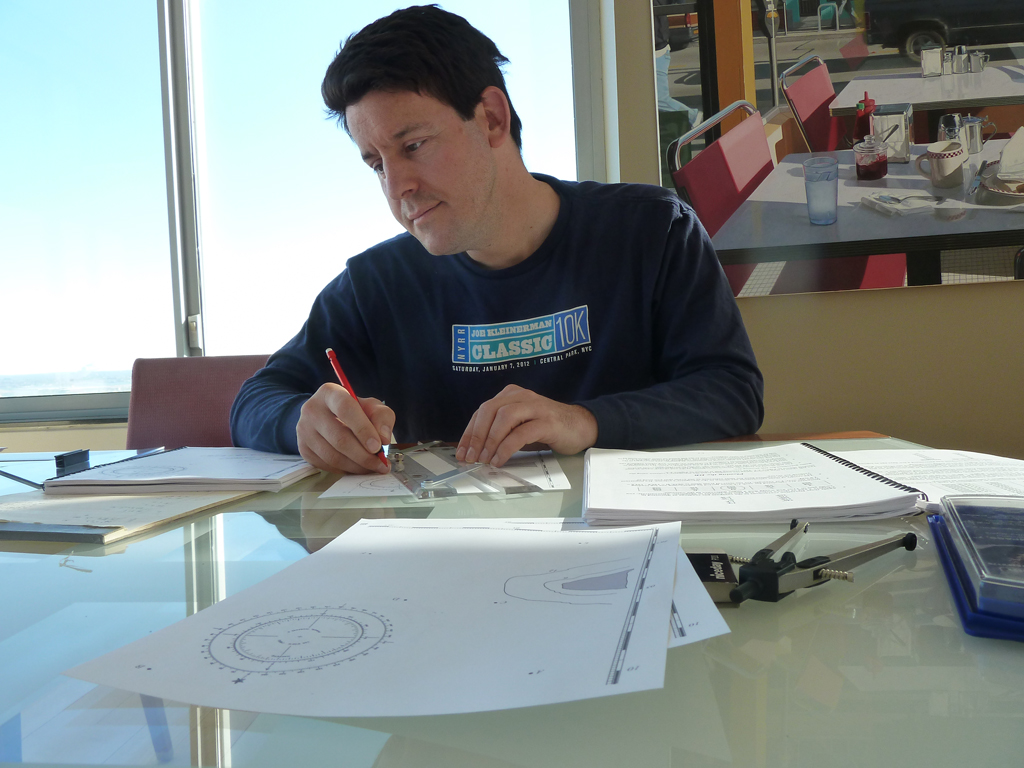
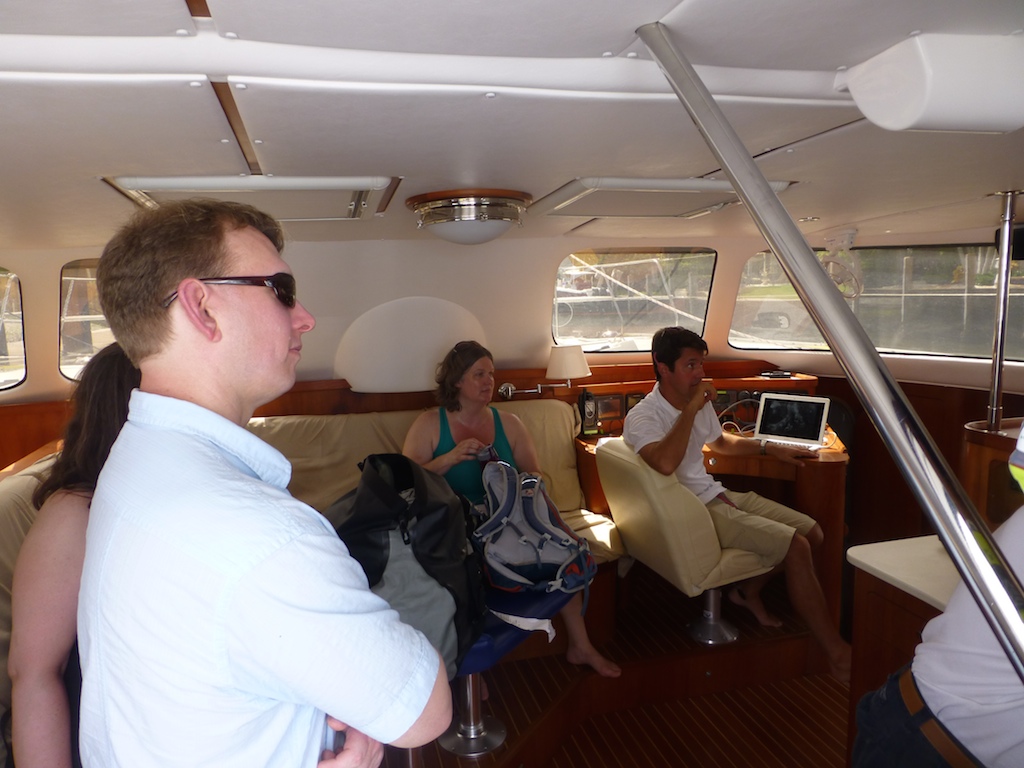
The crew of Two Fish believes that Edison’s harnessing of electricity was a step forward. In support of our belief, we have gone offshore with gobs of electrons stored inside our batteries. Let Lord Electron, me, give you a tour of the system.
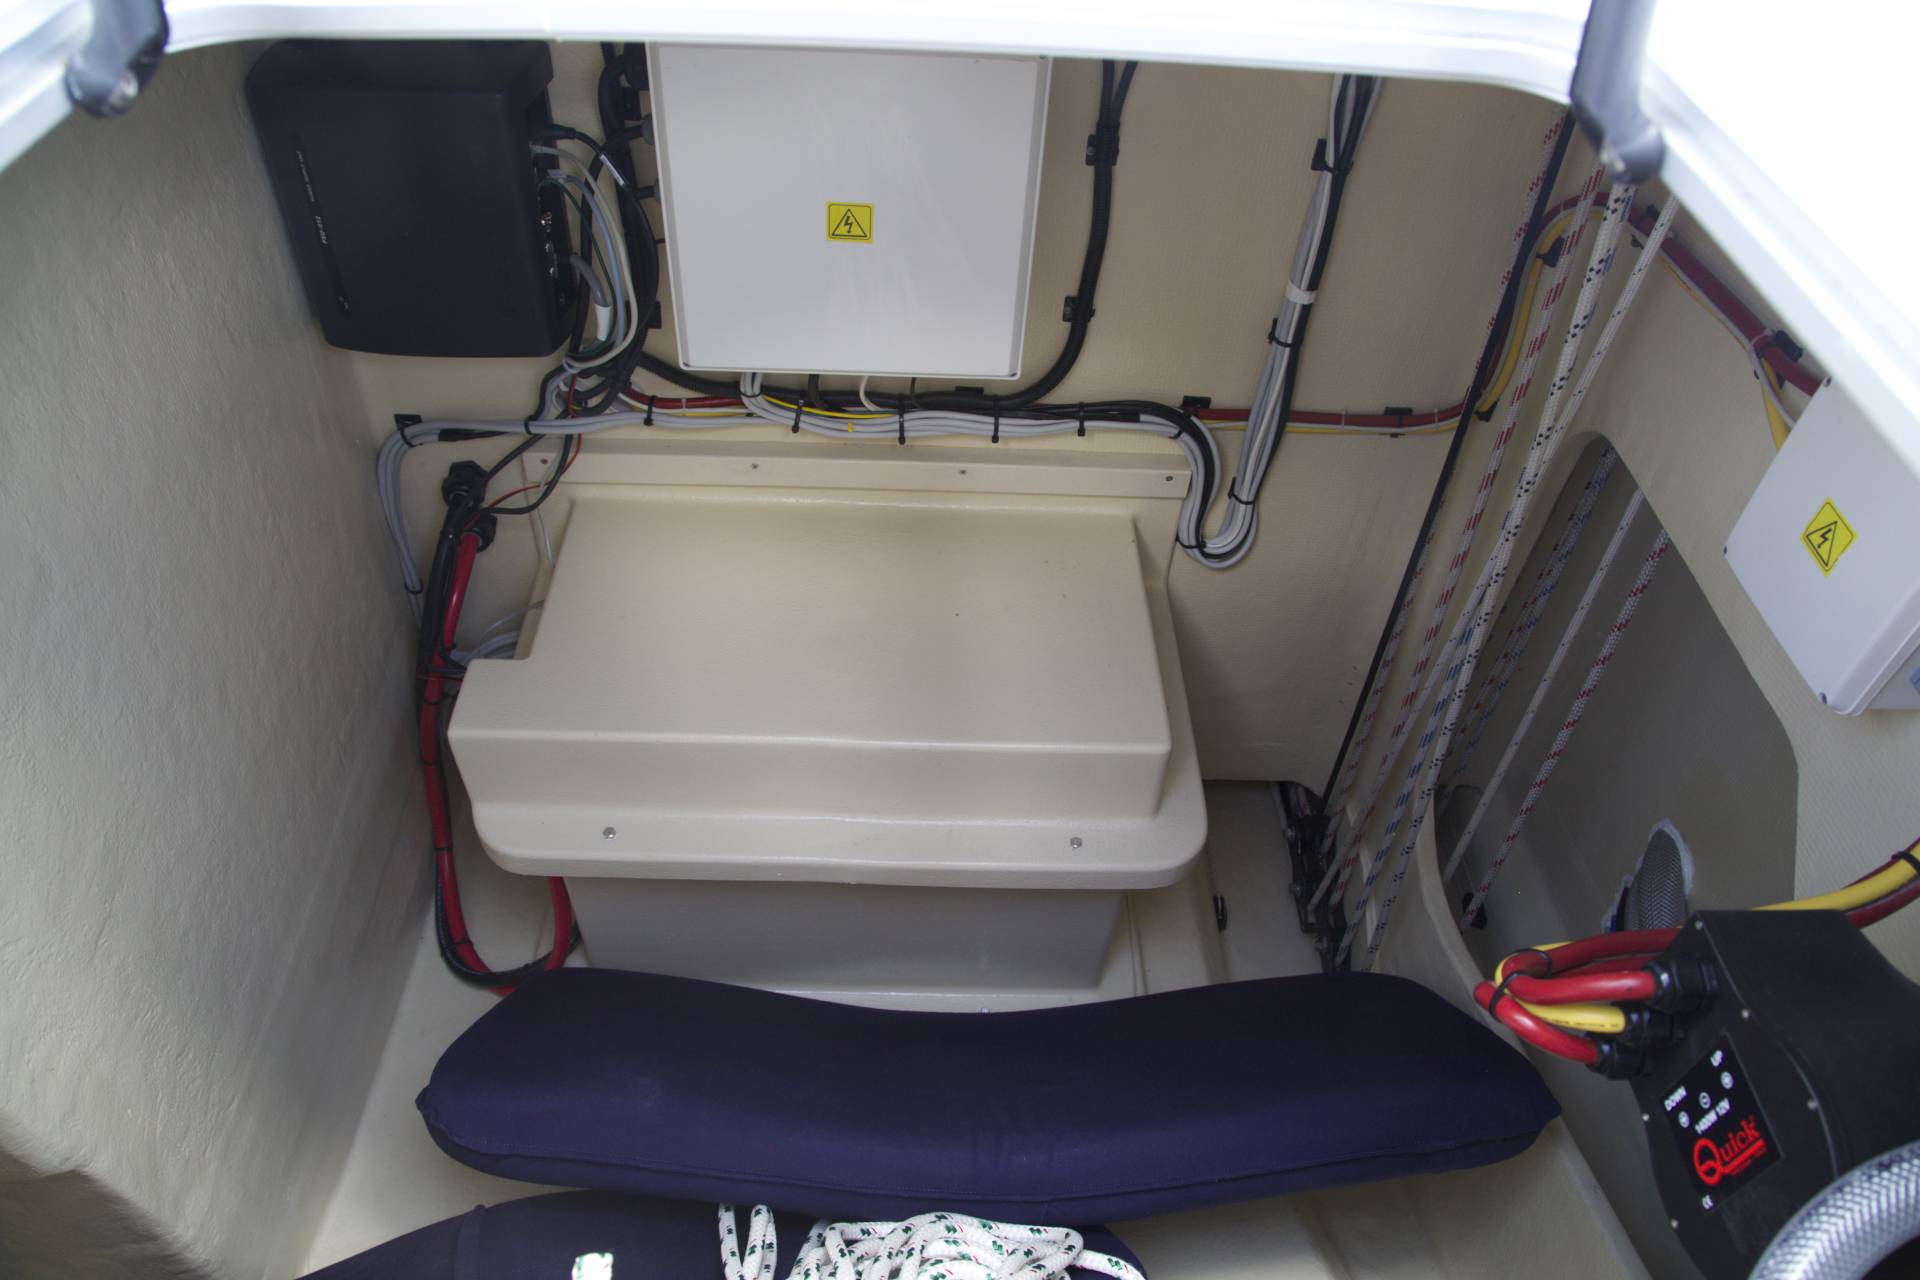
Batteries
We store our collection of electrons in four 6 volt batteries housed in a dedicated locker near the mast. The batteries hold 780 amp hours. If you plugged in a load that drew 78 amp hours, after 5 hours your batteries would be 50% discharged (Easy battery engineers! I know I took a short cut with battery math, but we are just trying to cover the basics). These batteries are not high tech batteries, as evidenced by the primary use – propelling golf carts. To avoid damaging the batteries one should not allow them to discharge to less than 50% of capacity. Two Fish has a conservative 60% recharge rule. There are many young chemical engineers working on new battery types that can be completely discharged. Lithium ion batteries are a step forward, however, the folks at Boeing might remind us that fires can come with new technology.

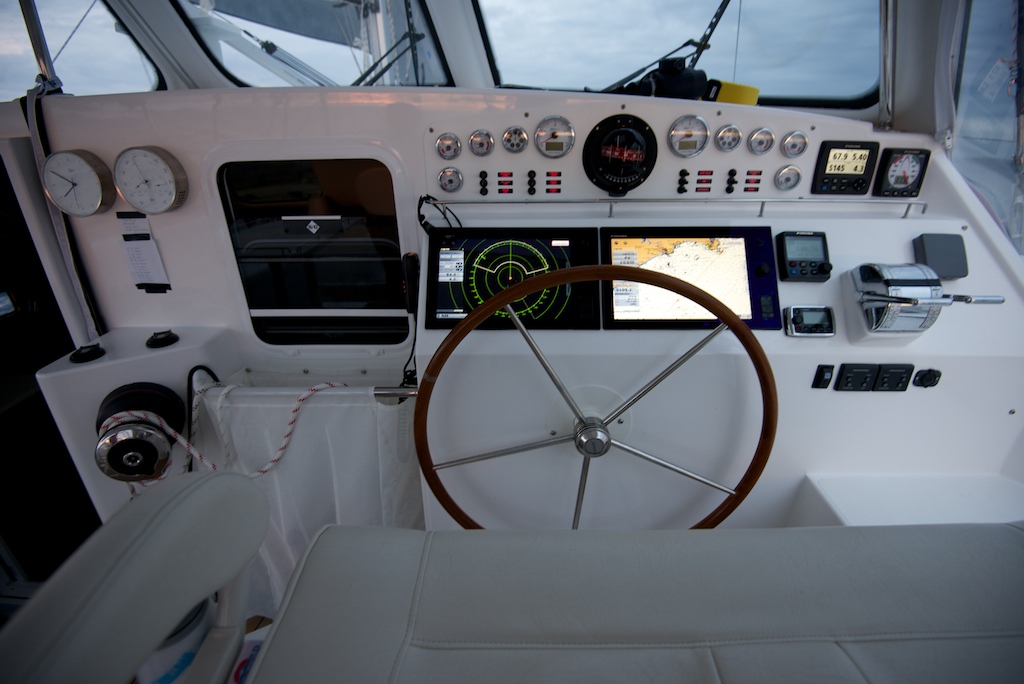
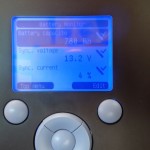
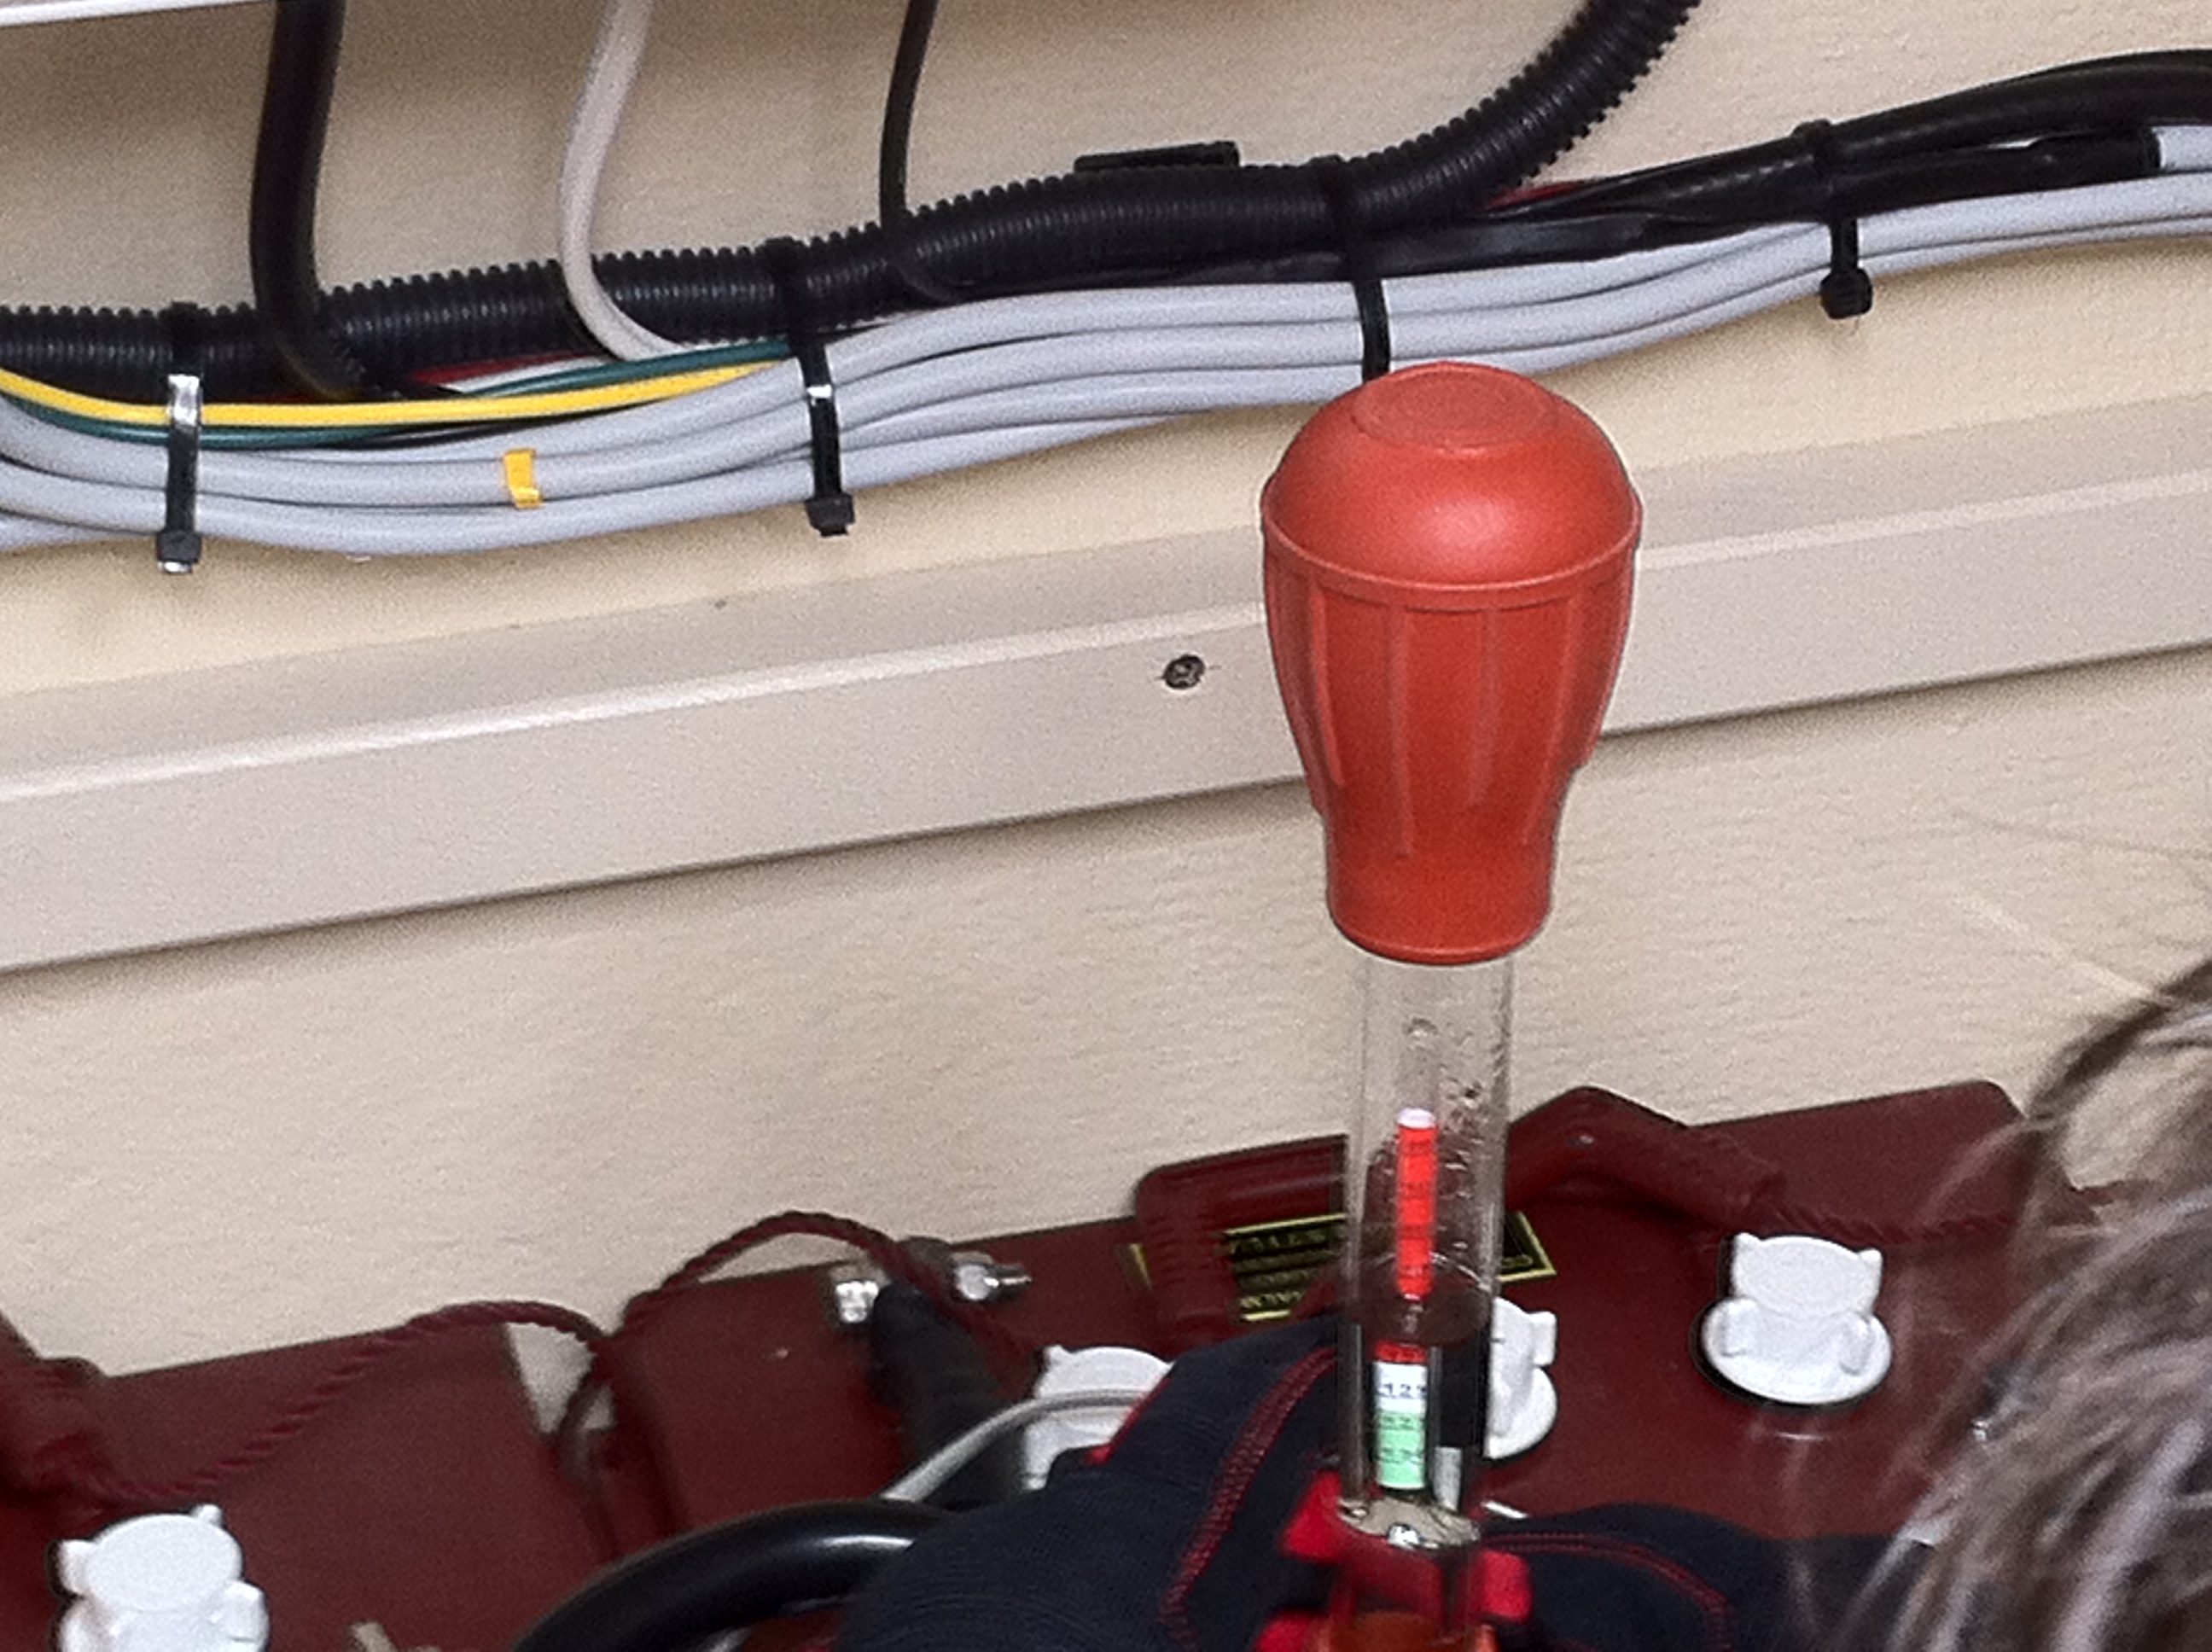
Analog Volt and Amp Meter – Part of the Two Fish Electrical Panel
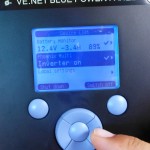
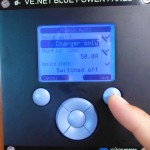
One wildly inaccurate way to keep track of your batteries is to look at the voltage meter. The problem with the voltage meter is it gets fooled by loads coming in or out of the batteries. The old rule of thumb was 12.5 volts is 100% charged and 11.5 volts is 0% charged. I will let you figure out the points in between. This formula falls apart when you have a strong charge coming into the batteries – the voltage meter might read 14 volts. On the other hand, turn on the microwave via the inverter and your freshly charged batteries may show 11.8 volts. In the above photo, one can see a knob in the center that selects which battery’s strength is displayed. The choices on Two Fish are House (a combination of four batteries), starboard engine starter battery, port engine starter battery and generator starter battery. Most of this post is about the house bank since they power everything other than engine starts. Actually, in a pinch the house batteries can start the engines, pretty nifty?
Astute readers will notice that the house batteries, in the above photo, are reading 13.0 volts. These astute readers will go on to remember that the 13.0 exceeds the rule of thumb’s 100% charge level (12.5 volts). Is Two Fish a special boat that hold a 150% charge? Unfortunately, no. When this photo was taken she was plugged into shore power which is one of the many cases where the “12.5 volts is 100% charged” rule falls apart. I dwell on this point since there is an elegant way on an Antares to address the shortcomings of the crude analog voltage meter. The VE.net panel gives Lord Electron, aka Jason, a prescient view of his kingdom.
Golf cart batteries
-
-
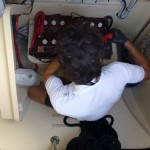
Battery locker is well-ventilated
-
-
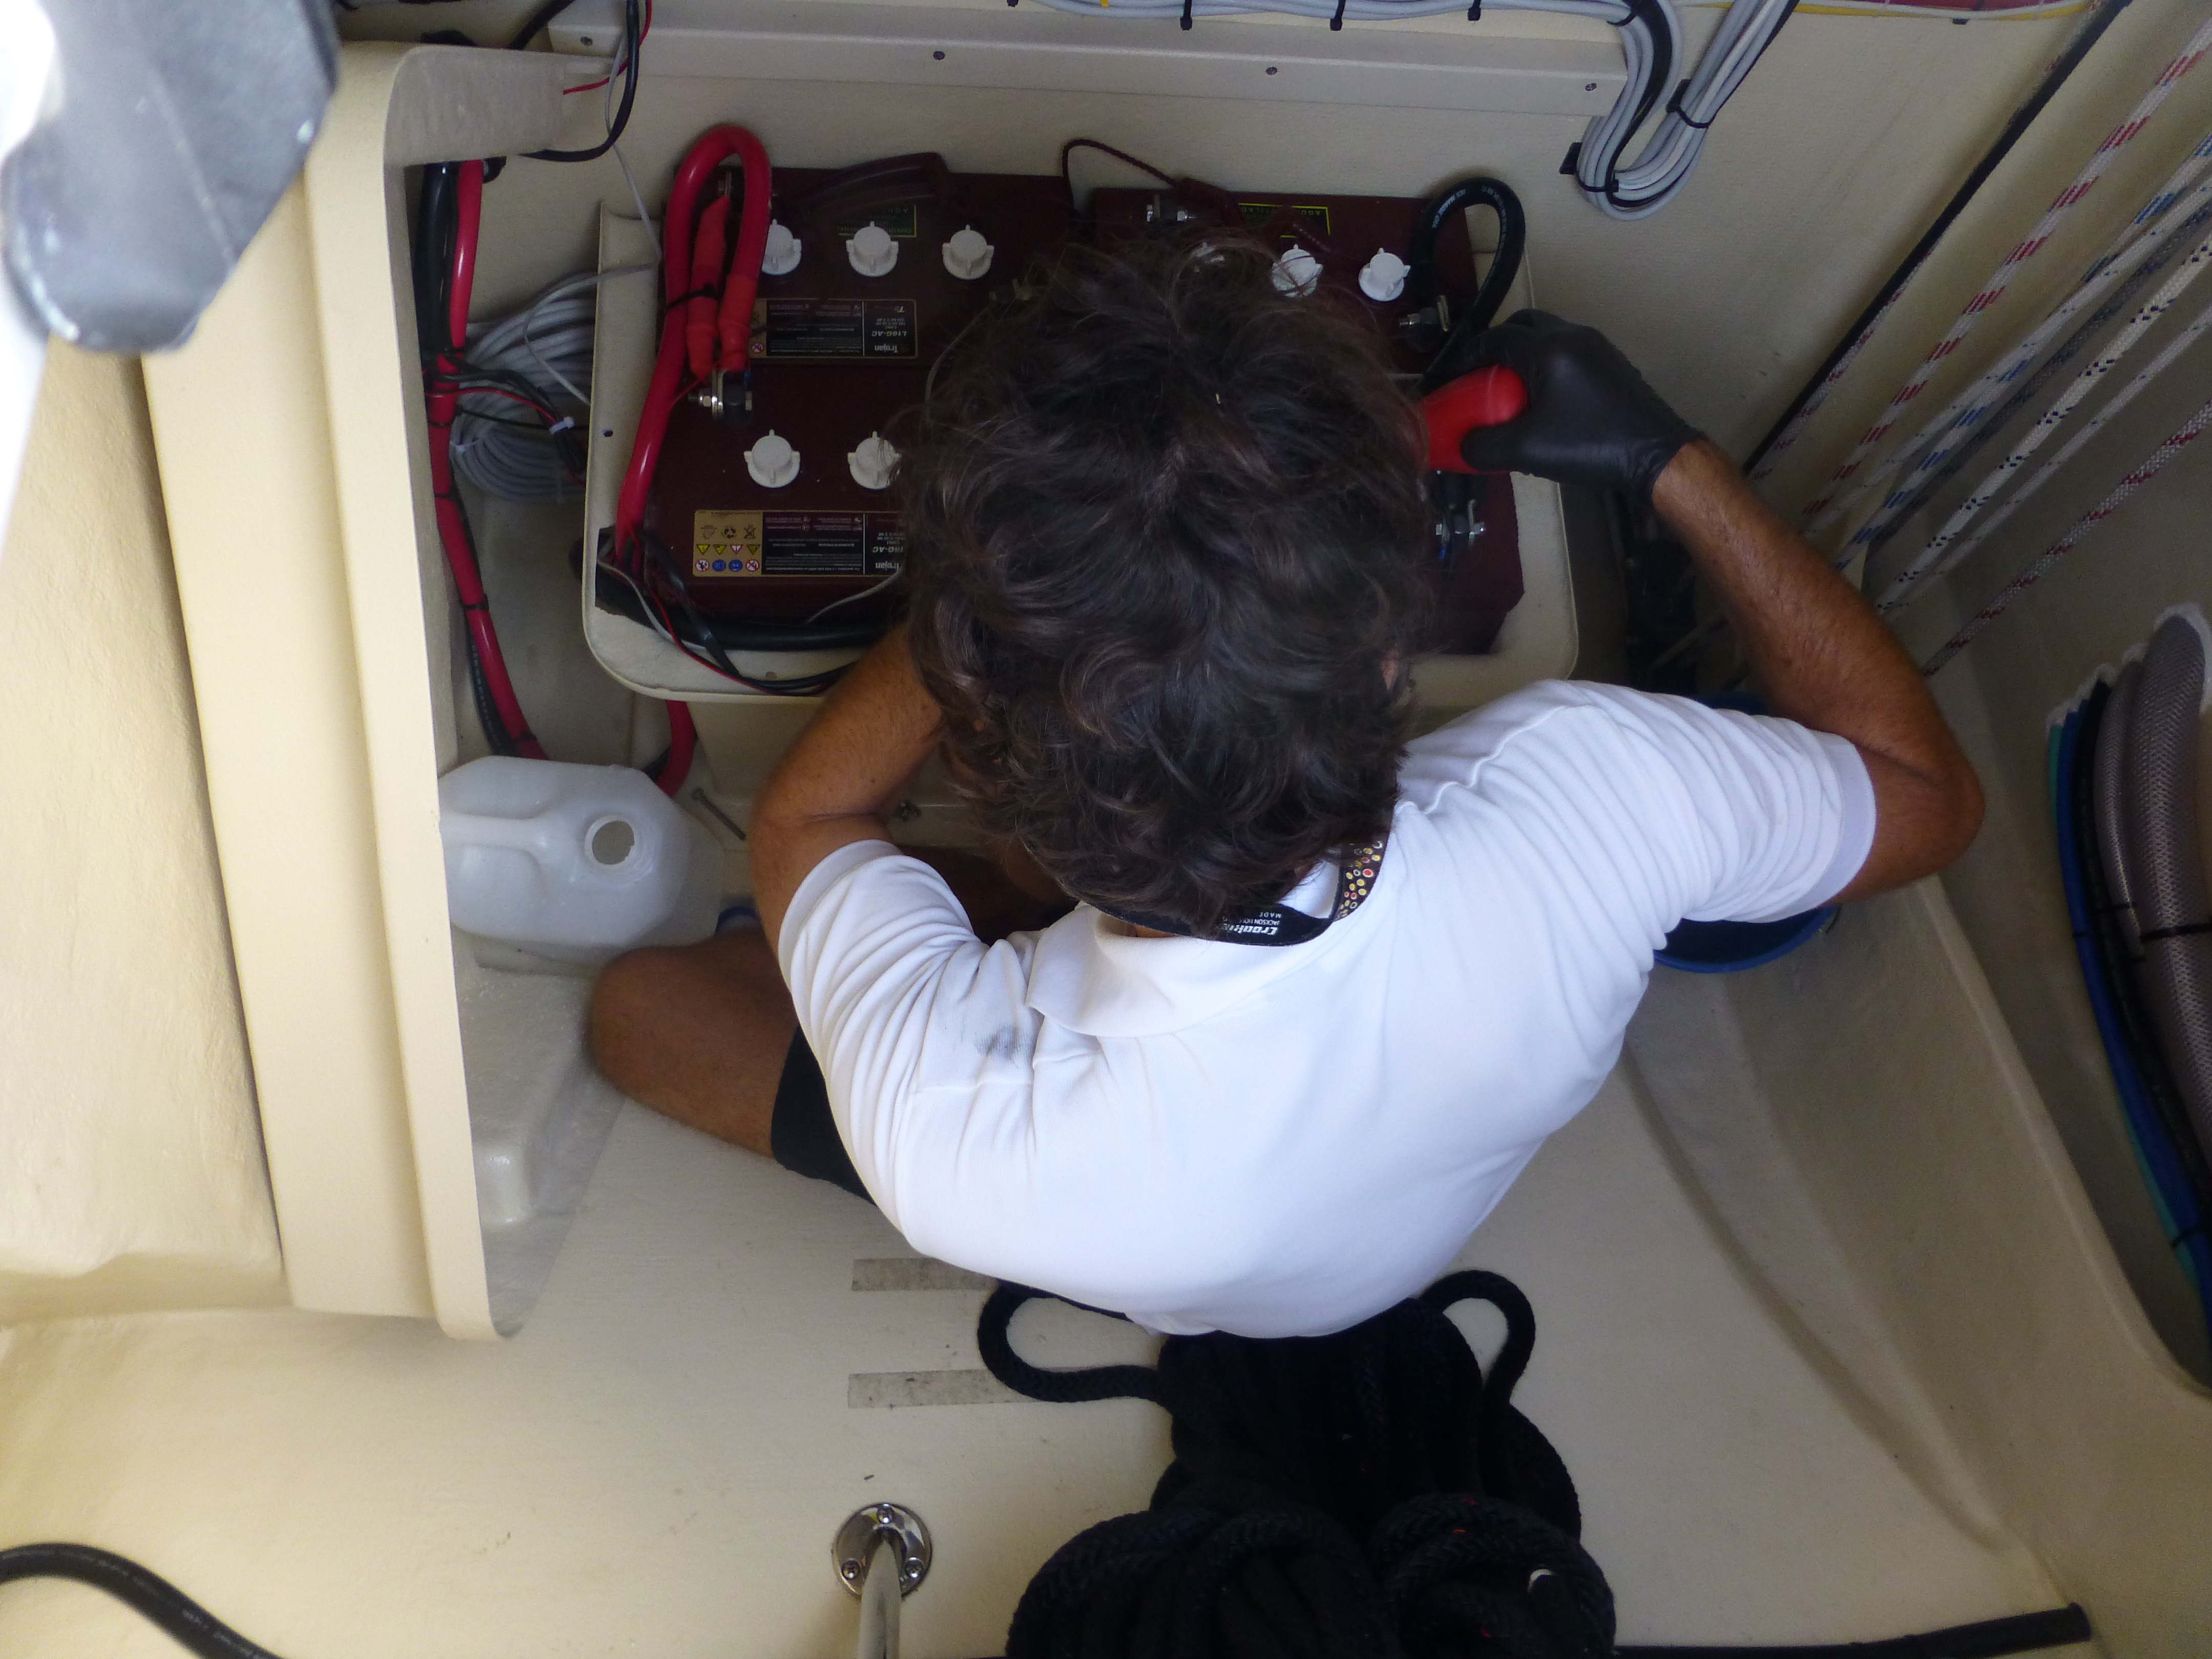
Adding water to batteries is required every other month
-

-
Hydrometer tests the strength of the batteries
-
-
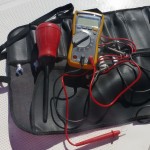
Multimeter and baster for adding distilled water

Electrical control panel
Battery professionals refer to Two Fish’s type of batteries as “dumb” batteries. Two Fish disdains this industry agreed nomenclature. Lead acid batteries are aptly named as they have lead and acid on the inside. This is the similar naming convention used for the peanut butter and jelly sandwich. As the batteries lose charge, bits of lead fall off their plates and sink into the acid. When the batteries are charged the process is reversed and the lead plates neatly recombine. This process can only be repeated a finite number of times (cycles) before the battery just gives up and becomes lead acid soup. Live aboard owners typically take 4 years to exceed the maximum number of cycles, but this depends on how often you overstress your batteries by drawing them down to low states of discharge (less than 50%).
I often go to bars and boast that Two Fish can hold 780 amp hours of electricity. However, this is an exaggeration since I only use 40% of the total amp hours (312 amp hours) before recharging. For those that are nodding off this is an important number to remember. With fresh batteries I need to recharge them after drawing 312 amp hours. As captain, I need to manage the battery bank. Let’s say, I am about to take a snooze for 10 hours and the batteries are fully charged. The boat is sailing and there is plenty of electrical load, let’s say 31 amps. In 10 hours the batteries will be 60% charged and according to the Two Fish rules will have to be charged. I try to have a plan about the batteries just like I do about sail plan. Later I will discuss what items create large loads on the batteries. We will also discuss how quickly the Genset, the engine alternators and the solar panels charge the batteries. But first let me introduce the VE.net panel and some of its functions.
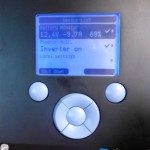
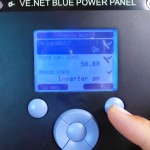
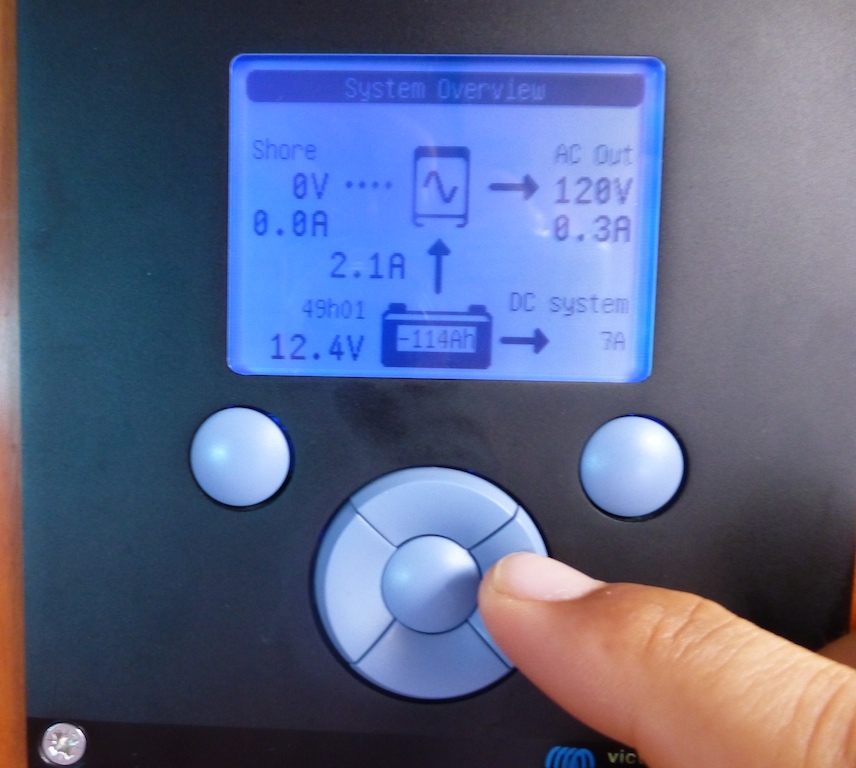
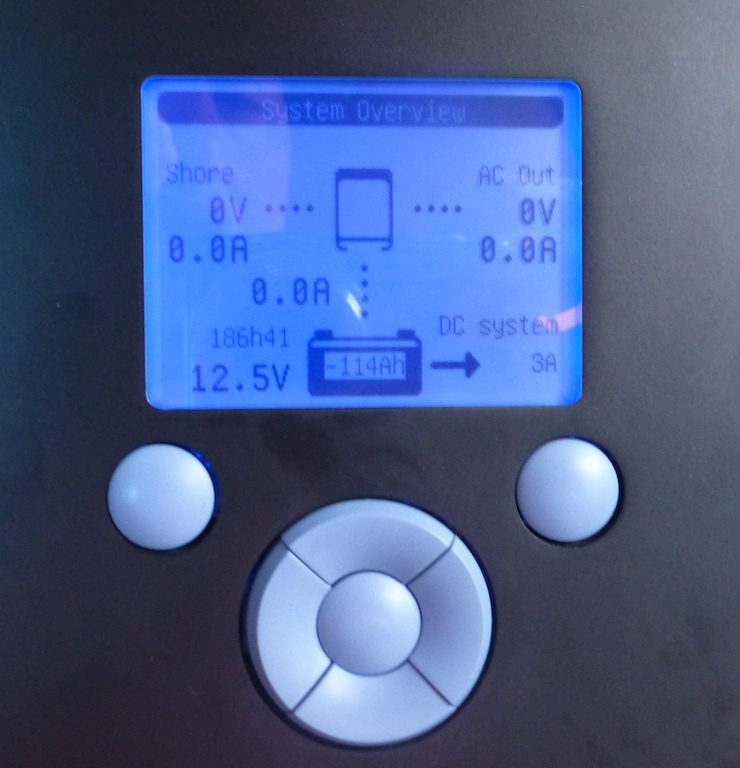
VE.net Panel – Understanding the home page “System Overview”?

Tour of VE.net home page data
The above photo is of the VE.net panel that is the brains of most, but not all, of our electrical system.
1) Starting in the upper left hand corner is “Shore 0 volts and 0 amps”. I am writing this while lounging at a remote anchorage in the Bahamas, so my shore power is not connected. When the Genset is turned on shore would read 120 volts and some amount of amps. Victron should rename shore “120 volt power input” but I suppose shore fits nicer on the screen.
2) The icon in the center of the top row represents the Victron charger/inverter (aka Multiplus). Victron has cast away the typical charger/inverter name in favor of the meaningless Multiplus. The charger/inverter is located under the settee and is controlled remotely with the VE.net panel. The remote panel reduces time spent on two sports cruisers are always engaged in: cushion lifting and body twisting in confined spaces.

Multiplus Icons from Victron manual
The icon appears in 3 major flavors as the clipping from the manual shows. I NEVER want the device off while cruising because then it will not be able to keep track of the amps and will lose count of our percentage battery consumption. I do not fret much if a guest mistakenly turns the charger/inverter off as it will find its way the next time the batteries are 100% charged. The manual calls this process synchronization. A long motor period or shore power are common ways to give the batteries a proper top-up and encourage synchronization. It is automatic so I just wait and when the VE.net reads 100%, it is resynchronized.

Multiplus
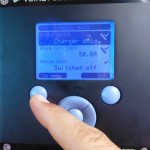
Most of the time, you will leave the charger/inverter in “charger only” mode. This keeps the amp tracker on and allows charging as the name would suggest. The icon will display device switched off if you have it in “charger only” mode and you are not charging. Once a charge starts, the icon will change to the equal sign.
The final mode is “inverter mode” which powers any 110 volt devices that are hung off the inverter. Our inverter can power the microwave, KVH satellite internet, the 110 volt outlets, and TVs. The advantage of having these devices off the inverter is to be able to heat a cup of soup without needing to start up the genset. The disadvantage is that the inverter is a small, inefficient, power station. Drawing 12 volts of direct current from the batteries and converting them to 110 volts of alternating current, for the desired use, wastes electrons. So that cup of soup may draw 1.5 times as much power when being inverted. Like all things on the boat, one must balance the trade-offs.

Gauges for 110 volt usage
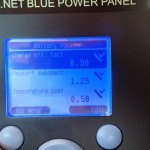
110 volt items that are not on hung on the inverter are too demanding and need the genset or shore power. These are: the air conditioning, dive compressor and water maker. The photo to the right displays how to monitor the 110 system. In this case the voltage should read about 120 and the load current will depend on the items drawing power. There are two 110 volt banks, so I need to move the rocker switch to see each bank’s load. A sistership is investigating changing the water maker wiring to run off the inverter; this would allow them to make water without engaging the genset. I am waiting to see if that experiment works. So far, the genset is so quiet that many folks at the helm during passage are unaware that I have turned it on.
3) The third item of data on the VE.net panel is AC out. If I turned on my air conditioning, the AC out would not change. AC out only shows 110 items that are connected to the Victron. As mentioned earlier the demanding 110 volt items are not connected. Their draw can be seen on the analog gauge shown in the above photo.
4) The arrow pointing up from the battery displays that 2.2 amp-hours are being drawn from the batteries by the inverter. I am charging my laptop while I write this post. By the way, the inverter requires power even when it is doing nothing. About 2.5 amps. So when not inverting turn the status back to “charger only”, NOT off.
5) There is a battery icon in the bottom center. Inside the battery it shows the number of amp hours already used. In my case it is 113 amp hours. When that number exceeds 300Ah I need to turn on the genset.
6) To the left of the battery icon is dumb voltage (12.4V). Despite it appearing on a modern screen it is no more useful than the analog battery meter.
7) On top of the voltage is the hours I have remaining in my batteries at the current run rate. This does not account for my early recharge strategy, so I do not use it. Instead, I divide amp hours left(200) until I reach my target recharge point of 312ah by expected average load (10) and calculate I will need a charge in 20 hours. Expected load is something I learned over time; I will show some numbers on this later.
8) Finally, on the right hand side of the screen, is a very important bit of data. It is showing the NET draw of 8 amps from the 12 volt system. An example could be that the fridge and freezer are drawing 8 amps but solar is producing 5 amps so the NET 12 volt is 3 amps out. If the arrow changes direction then your NET on the 12 volt side is charging your batteries.

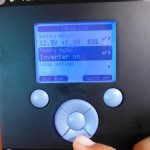
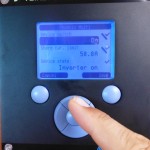
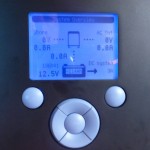
Final Exam – What does this tell you?
As a final exam, lets look at my current panel while on the hook. The picture to the right tells us what? 1) The sun is shining because the NET production is 9 amps coming in. My fridge, freezer and some fans are running so I estimate that the solar is producing close to 20 amps. 2) The Inverter is on, but should be turned off since the amp cost of having it on is 2.5 amps and there is no usage. 3) No AC loads are on and shore power/genset are off.
Why is the VE.net worth the big bucks?
I have already warned you not to use the crude analog voltage meter for gauging battery status. Instead, use the fancy VE.net panel that came standard with the boat. The VE.net machine counts amps. At the nexus of the system there is a shunt. From this shunt the VE.net panel watches traffic crossing the shunt. The panel “writes down in its notebook” any amps coming or going from the batteries. This toll taker watches the fridge drawing 4 amps per hour for 3 hours and knows 12 amp hours have left my cherished accumulation of amp hours. It also watches the solar panels produce 15 amps from 10 to 11am and adds this positive to the tally. This is worth some bucks but I haven’t decided how many.
There are some features which I do not use on Two Fish. For example, the Victron has the brains to help the genset via power assist mode. This feature would be useful if I had all 3 air conditioning units running and the genset powering them. AC units are trouble during peak load, which occurs in the first few seconds of cycling on. So if all three AC units cycled on at once you may trip the breaker as it is too much load for the genset. The Victron could fill this gap for a few seconds by drawing on the batteries. I have only had my breakers trip once, so I do not feel it is worth making all my 110 systems dependent on the Victron. In my current wiring, if the Victron fails, my genset can still power my water maker or AC. If wired my system for power assist they would be dependent on the Victron. Trying to keep it simple on Two Fish. The VE.net could also turn on a genset and send many alarms of battery state. Again, Two Fish is about less.
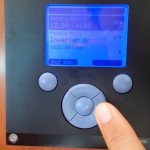
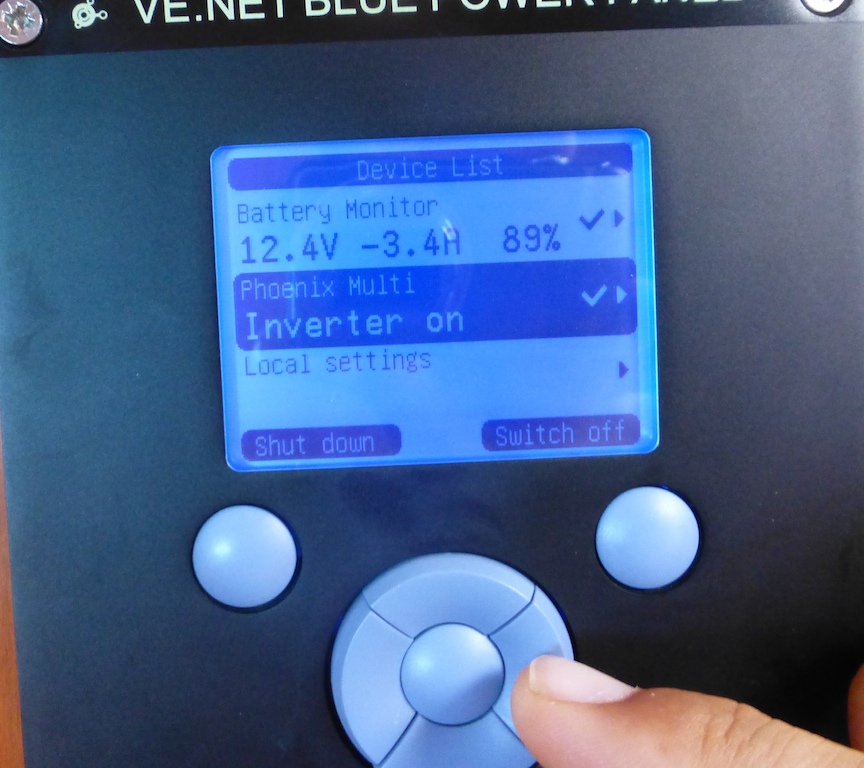
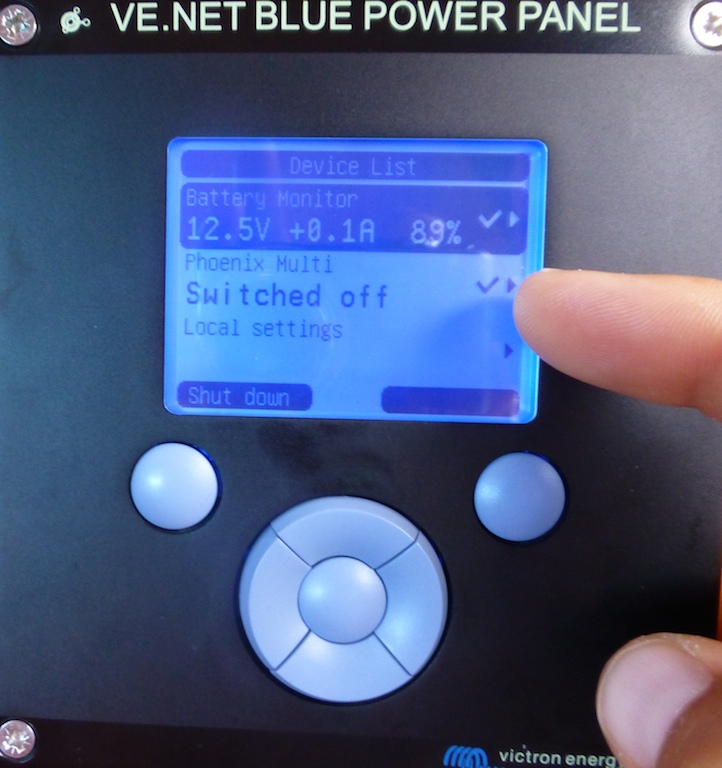
Device List Screen – Very Important

Device List screen explanation
To get to the above screen click the center button while in the system overview screen.
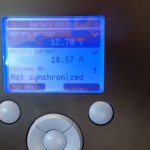
1) The new screen is called the device list.
2) 13.1 volts (still stupid) is the voltage of the house bank.
3) +.3 amps is the load on the batteries, close to nothing, so solar must be helping.
4) And, finally, the crucial data – percentage charge of the house batteries. We are 99% charged in this photo. This was calculated by the toll booth at the shunt. If the battery does not get back to 100% for a long time, the toll booth clerk can lose count. However, this has usually been a very good guide for state of charge (SOC).
5) The speed of charging- float is the slowest rate of charge and occurs when the batteries are in a fully- or nearly- charged state.
Not just the captain should know how to check the state of charge. Guests should be able to glance at this too and notify the captain on the status.
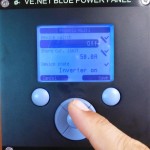
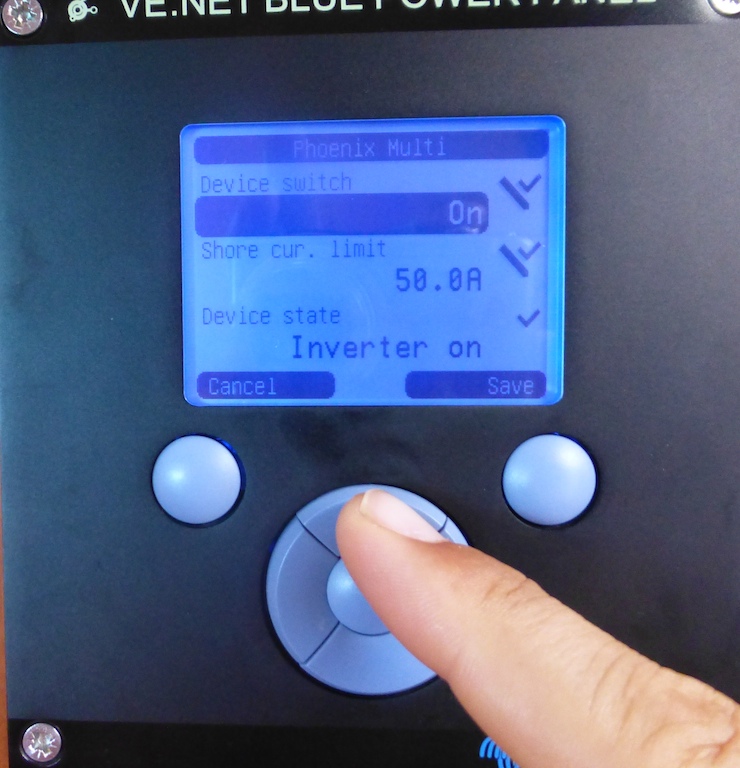
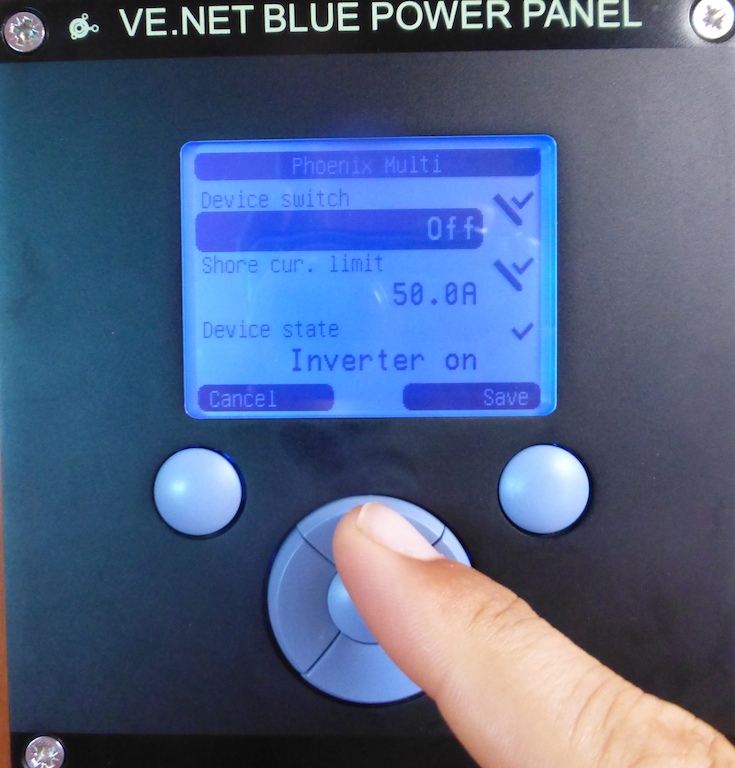
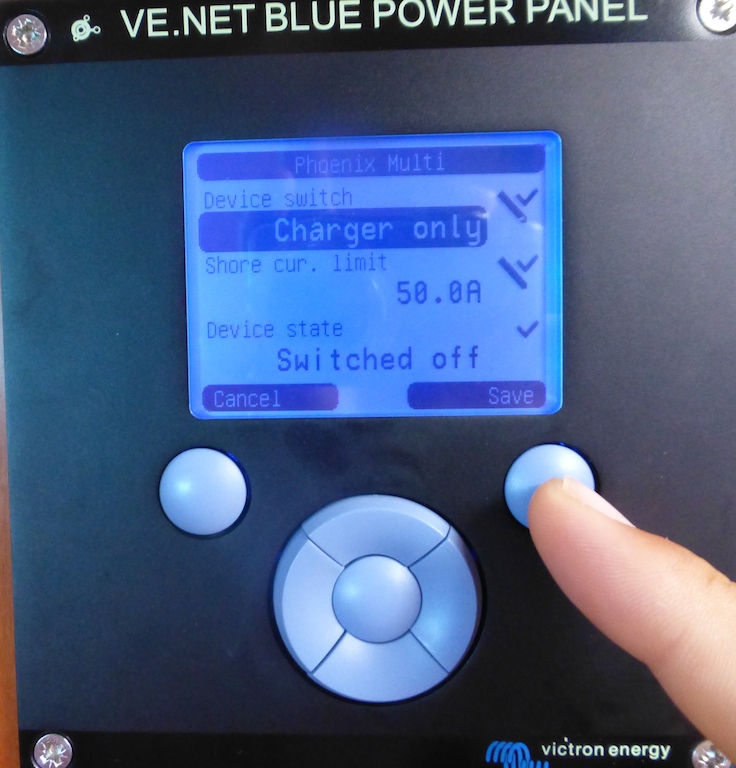
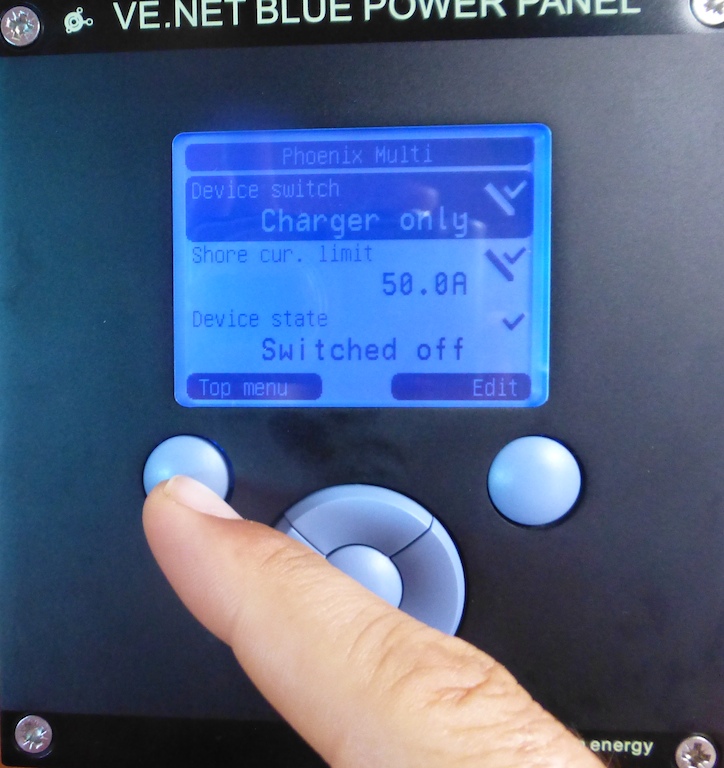
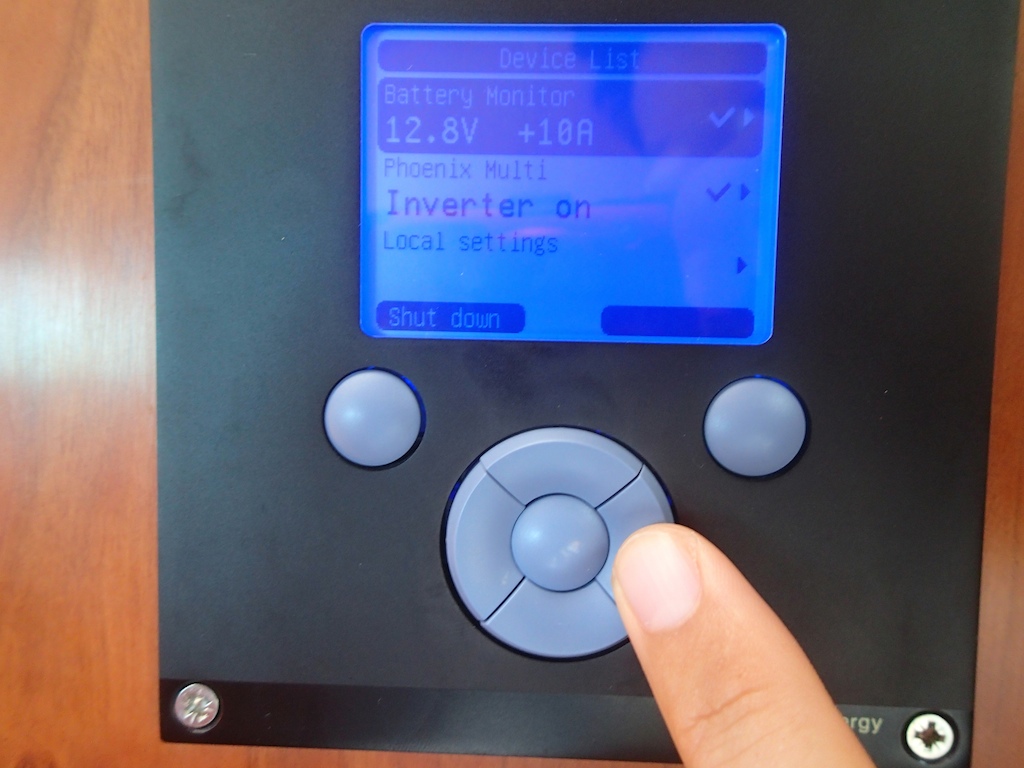
How to turn the inverter on
We turn the inverter on and off many times a day. Morning coffee, check the weather via sat phone, charge a computer and making ice. Unfortunately, there is not one easy button to turn on inversion. Here are the steps.
-

-
#1 right-click to enter new page
-
-
#2 Device list page (inverter is on)
-
-
#3 down button one time
-
-
#4 right button one time
-
-
#5 press edit
-
-
#6 press up button
-
-
#7 press up again
-
-
#8 press save
-
-
#9 press top menu
-
-
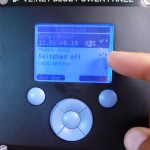
#10 Now displays switched off even though charger is on
-
-
No inversion is shown
Checking the VE.net config
The factory sets the VE.net for new owners but it is worthwhile to check these menu items.
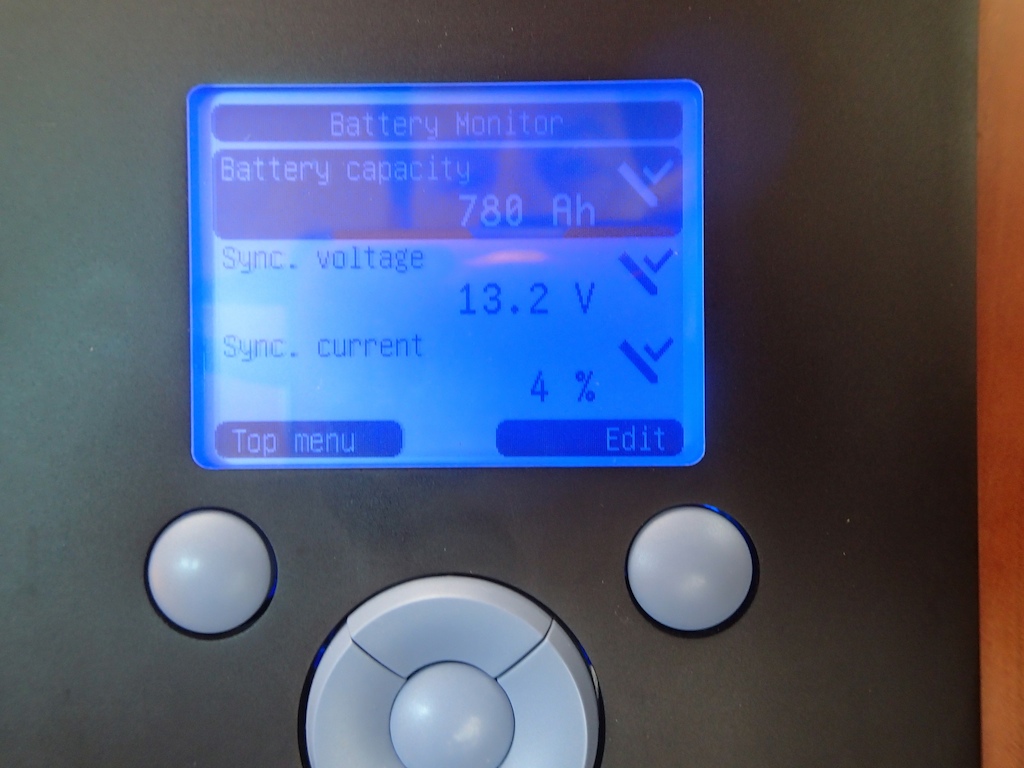
1) Ensure that VE.net knows you have 780ah
2) Ensure that the maximum charge in ah is 120.
3) Ensure that shore power can not be more than 50amps.
4) Ensure that battery type is lead acid.
Going through the menus is laborious but it gave me a lesson into the mind of the VE.net panel. There are 50 or more settings to investigate. Does it dream at night?
-
-
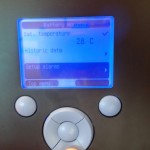
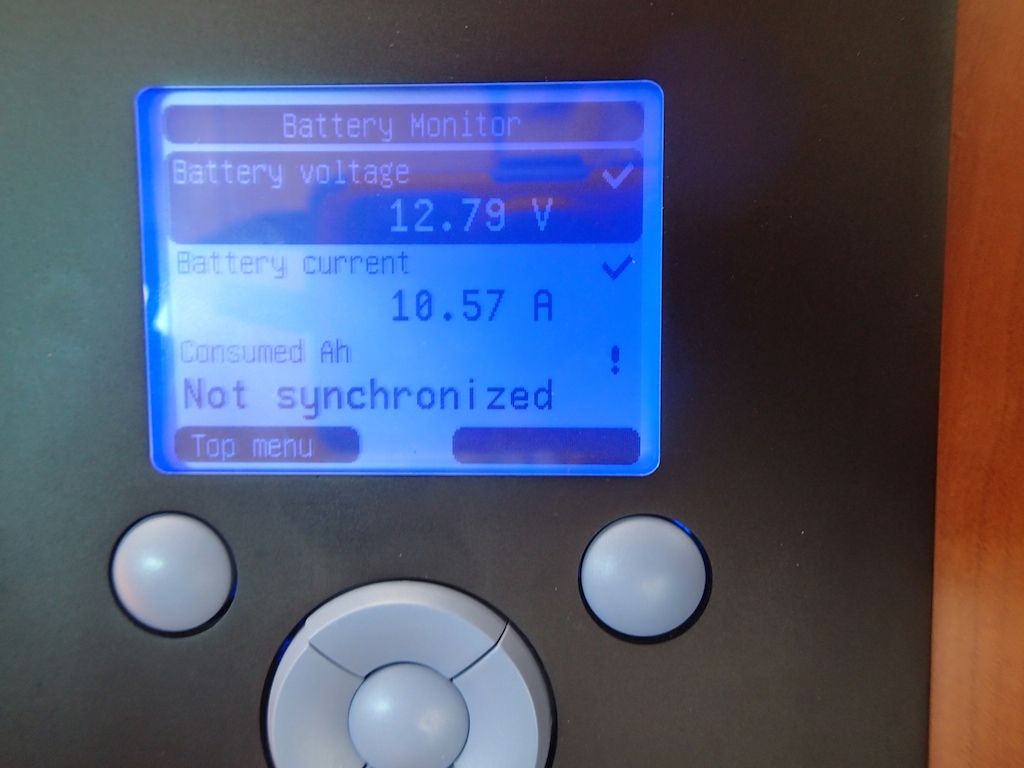
#1 right click to get to Battery Monitor
-
-
#2 click down (note battery not synced)
-
-
#3 click down to view selections (note that battery temp is great)
-
-
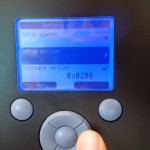
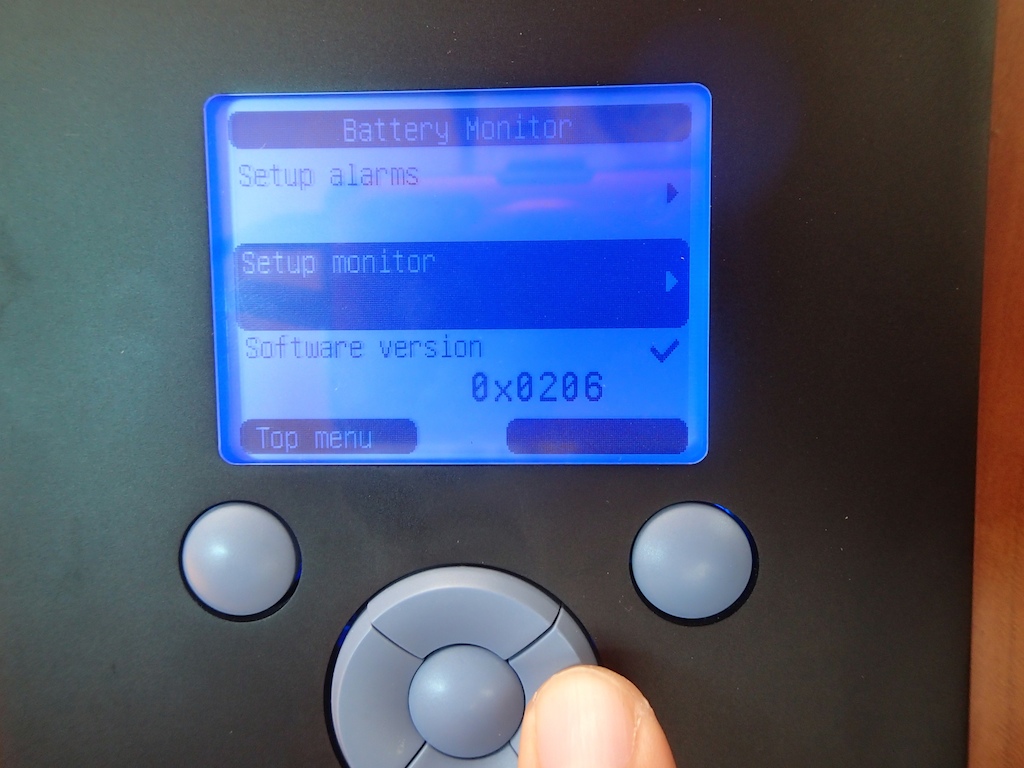
#4 right click at set up monitor
-
-
#5 confirm battery capacity and battery type
-
-
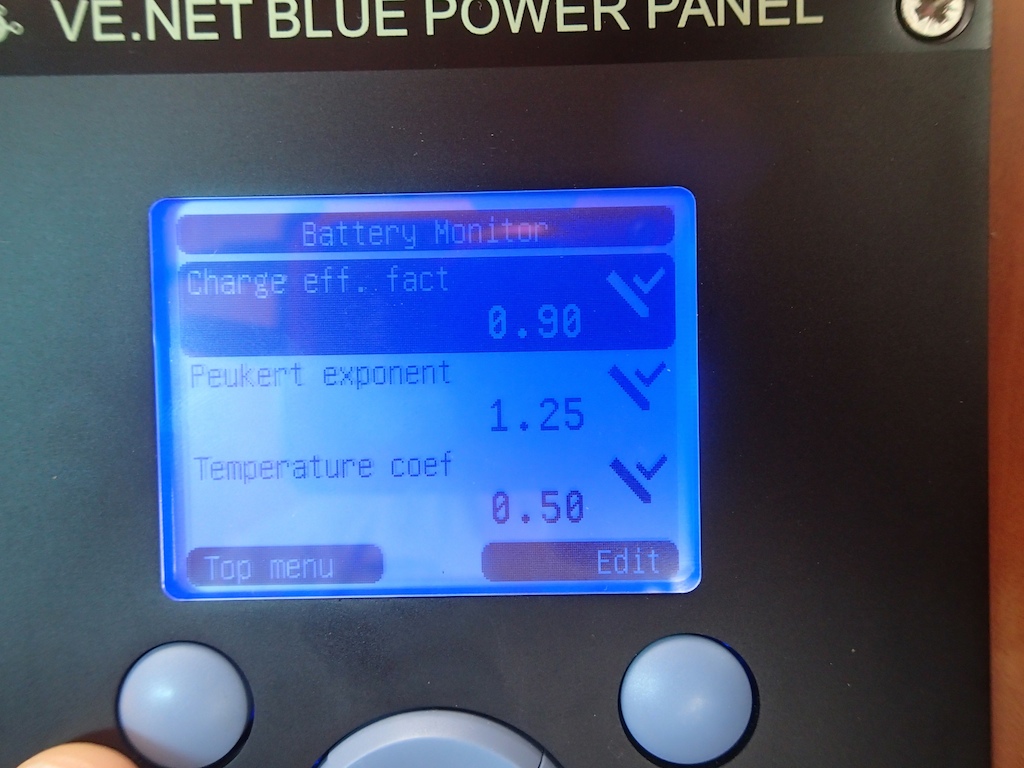
#6 do not edit the more complex stuff
I have highlighted battery temperature because the VE.net is connected to a temperature sensor. This allows it to charge the batteries quicker and more safely. As the temperature rises, the charge should be slowed down to reduce the boiling of the acid. Too much acid boil and I have to pour more distilled water into the batteries. Way too much and the batteries are damaged.
I also mentioned that you should confirm that VE.net knows your battery type. The charging equations are different depending on the battery type. In the mix of menus there is a battery type selector.
Usage
How punch is in the batteries in the real world? Assuming no new electrons come to stay, we can drive our 12 volt toys for 312 amp hours (40% of the total house battery bank).

At anchor
At anchor we use about 10 amps per hour. 8 of that is the fridge and freezer. Add 2 amps if a bunch of lights are on. Fans are less than an amp. Anchor light is nothing. The number can rise to 20 amps if we are charging laptops and watching TV on the inverter. In short we can be at anchor and only need to Genset every third or forth day. We sometimes push it buy turning on the ice maker. This beast consumes over 10 amps and will cause the genset to be on a day early. When we run the genset for a full charge (60% to 90%) it takes 3 hours. With some conservation we can last 5 days without genset if we get sun and did not turn on the ice maker and other power hogs. If we are carefree we charge every 3rd day.
On passage at night we burn 15-20 amps; this is used to power the huge collection of navigation electronics (Radar, Furuno displays, autopilot and the fridge/freezer). We have run the boat with only one screen, but this does not save a lot of amps. US Coast Guard does not recommend traveling without the radar and I agree. So we are stuck. On 100% sailing days we need a 2-3 hour charge every day. Here is the math of our consumption vs our production. (24 hours x 17 amps =400 amps of usage, 100-150 amps of solar and 250 amps of genset production). I use dinner time as a nice way to sneak the genset on to power the microwave. All my guests comment on how little noise the genset produces. Any passage with a large amount of motoring will also produce excess power and the batteries will be at 100%. Great time to make ice and charge laptops.
Here are some sample loads for the 12 volt system:
KVH on inverter 15 amp hours
Ice Maker 14 ah
Engine blowers 13 ah
Underwater light 10 ah
Spreader lights 5.4 ah
Fridge/Freezer 8.5 ah (4.3 ah each)
Inverter 2 ah
All Stbd Cabin Lights 1.8 ah
Nav lights 1 ah
VHF 1 ah
Cockpit lights .9 ah
Stereo .6 ah
Wifi router .5 ah
Fan at hi .4 ah
Stair lights .3ah
Furuno RD33 .3ah
Vesper AIS .3 ah
Tri-Color .2 ah
Anchor light .1 ah
I plan to change the wiring for the boat-at-anchor set-up. I wish to have a few low power items on. AIS, RD33, wind instrument and VHF will be a good at-anchor combo. Currently, when I turn any instrument on, my DST and fish finder turn on and consume over 2 ah. A quick rewire or an additional switch for the two transducers, and I will have my low power set-up.
Production
We have four ways of charging the batteries on Two Fish.
Solar Panels
The solar performance data are limited since the VE.net displays net 12 volt consumption. Please bear with my crude approximations. Like a typical sport fisherman, I will start with my all time record solar production. Near the equator I captured 35 amp hours at noon. In sunny areas, but farther north, I think a peak production is 20 amp hours. Assuming I get 3 hours a day of 20 amps and 5 hours a day at 8 amps this would produce 100 amp hours per day. Again, I need better metering to understand the precise numbers. The fridge/freezer complex consumes 200 amps in a 24 hour period. Solar is nice but does not kick my diesel habit. Solar is great at topping up the battery from 90 to 100%. It is silent and can accomplish the slow charging from day break to sunset, stopping at the green flash.
Generator (Genset)
")
Generator (Genset)
The generator on Two Fish produces a very powerful 7.5 kilowatts. If the batteries were exposed to this much energy they would boil off their acid solution and become permanently damaged. The charger/inverter limits the amps allowed in based on user input and the state of charge. Assuming the batteries are 60% they will accept the maximum user defined charging. I allow 120 amps, which is close to the maximum the batteries can handle (per Trojan battery manual) and is the the charger/inverter’s maximum power. During this phase, one can see 120 amps coming into the batteries on the front screen of the VE.net. However, after one hour of charging the batteries do not contain an additional 120 amp hours. Charging is crude work and plenty of power is lost. My rule of thumb is in one hour my state of charge will improve 10% or 78 amps. So 42 amps are dissipating. In practice, if you want to take batteries from 60% charged to 90% charged you will need 3 hours of genset. This is a great time to produce two full water tanks, warm the hot water tanks, use the microwave, check the sattlelite weather and charge computers. I like to be at 90% at dawn so the sun can top up the batteries during the day.
NOTE for charging with the genset
1) Turn all breakers in 110 system off. Turn off inverter at the VE.net panel.
2) Start the genset by pressing start button for 10 seconds and wait 2 minutes for warm up. OK, sometimes I go earlier. Is the mushroom open on the genset locker?
3) Turn on the breaker switch labeled Gen first. Then flip the breaker switch labeled parallel on. Then slowly add load. First, turn on the charger breaker. In 30 seconds the VE.net will register the charge coming in. Add other items as you wish but spread out the load. Keep an eye on the amps. Per the manual, the genset likes between 25% to 75% load. I usually run between 20 to 40 amps of items.
Alternators on the Engines

Alternator
Each engine has an alternator that sends a 12 volt charge directly to the batteries when the engines are running. The number of amp hours is dependent upon the number of engines and their operational RPMs. When in cruise mode, we often produce 80-100 amps, a number on par with the maximum of 120 amps. We are not sensitive to this charging speed since when the motors go on they tend to be on for plenty of hours. If our genset ever stopped working, the engine alternators could charge the batteries and run any 110 items that are hung on the inverter. However, we could not run the water maker without the genset. You do not need to have the charge breaker on for the alternators to charge the engines. The alternators have their own charge controllers and could function if the Victron was not operational. The charge they produce is seen by the VE.net when it passes over the shunt.
Shore power
I have not done proper speed tests for charging while on shore power. It has not been an issue, since one tends to be plugged in for 12 hours at a minimum. When connecting to shore power there are a few tips we keep in mind.

Shore power turned on
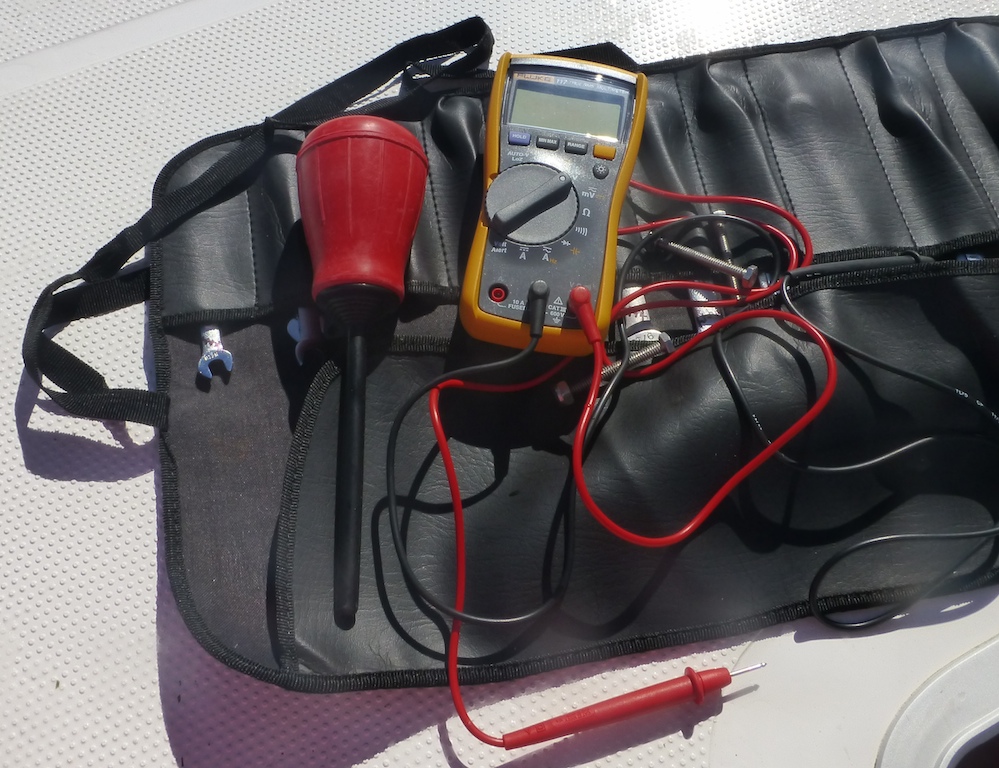
1) We always multimeter the shore power we are about to use to confirm it is the proper voltage. The three pairs of socket holes should produce 120, 10 and zero volts. They are usually well-protected so you must be persistent with the probes.
2) Examine the shore power for amperage. Two Fish has two 30 amp shore power cords. Marinas often have 50 amp service. If this is the case we use our pigtail (bought at West Marine in Puerto Rico) to split the 50 amp derive into two 30 amp services. We then plug our cords into the pig tails. Marinco makes our pig tail and we like it so far. It has a flashlight built it and a nice locking mechanism.
3) Before plugging in, speak to the marina staff and ask the status of the power point, the amperage and voltage.
4) Turn the boat off! Ensure all of the 110 volt breakers are off. Ensure the Shore 1 and Shore 2 power are off (they are on in the photo).
5) Attach pig tail to power point and ensure the blue light on the pig tail turns on.
6) Attach shore cords from our Glendinning automatic cord spoolers. After attaching, ensure the breaker located in the starboard aft locker indicates green for power on and that there is no red light for reversed polarity. Most Antares do not have the Glendinnings so they check polarity on the main electrical panel. We find the Glendingings are a good, but not a must-have feature. I love how they so cleanly stow the cables in a spot I would never use. Your cables exit at the stern, which can be tough if the power source is at the bow. We have had no service problems and they spool easily if done carefully with one person feeding and the other person pressing the spool motor switch. Sounds complex but it is like storing a garden hose.

Glendinning shore power spools
7) Turn on shore power 1 and confirm 120 volts and no amps. Repeat for shore power 2. If you can only plug in one shore power service, then plug in shore power 1. You will then need to turn on the parallel switch to use 110 volt items on your second bus B. Beware – you only have 30 amps so do not turn everything on at once.
8) Ensure the inverter is off.
9) Turn on breakers. I start with the breaker for the inverter/charger. This allows the 110 power to go to the charger. It will take almost 30 seconds for this to appear on the panel, be patient. When the power has come to the panel you will see the icon change, amps going into the battery and a charging state (i.e. bulk).
10) We detach in reverse order. Turning off breakers for individual items first and unplugging from the power point last.
Shore Power in Foreign Lands
Our Multiplus (charger/inverter) is set to accept 110 volt power and charge 12 volt batteries. We would need to buy more equipment to plug into a 220 volt marina. When cruising Brazil, we chose to never plug in to shore power. I was fearful of the quality of marina power in Brazil after a sister ship had severe damage from poor marina wiring. The loss in power of not using shore power was trivial. We never had weather in the marinas where air conditioning was a must and we charged the batteries with a quick run of the Genset after a couple of days. Solar power kept charging to an acceptable minimum. I knew world power comes in two flavors, 110 and 220. But I did not know 220 volt power typically comes in 50 cycles and 110 volts 60 cycles. If you transform 220 volt power into 110 volt power the Victron equipment will accept this power. However, you will now have 50 cycle 110 which is not expected by some of the electric motors. Imagine a biker who is designed to pedal 60 cranks per minute dropping to 50. With some electric motors this can create long term damage, while other motors do not mind the odd cycles one bit. I do not have a clue which motors on Two Fish are sensitive to the cycle issue, because I have stayed with only the correct cycles. I know of an Antares that ran their heat and AC on 50 cycles for a year and the AC motors had no service issues after 6 years. I also have heard that on one boat the washer/dryer would not run on the wrong cycles since it had a cycle sensor that forced and auto shut down.
Battery Charging Phases
There are 3 phases for charging the batteries, according to the marketing guys at Victron. (Bulk charge – for batteries less than 82% charge, absorptive charge for batteries 82-92% charged, and float charge for almost-full batteries). As the batteries get more charged, they need a lighter touch when putting in additional electricity. Rather than using the goofy marketing terms on the VE.net panel (5th line down “Charge-float”), VE.net will show the amps being directed at the batteries. Some real data from my time charging the battery with the genset.
At an SOC of 65% the batteries were taking in 120 amps.
At an SOC of 77% the amps dropped to 115.
At an SOC of 84% there were 113 amps flowing in. (marketing term change from bulk to absorptive)
At 86% SOC it was at 98 amp.
At 88% it dropped again-to 75 amps.
By 90% SOC, the batteries were only receiving half of the initial punch – 60 amps. I usually turn off the genset when the amps coming in drops under 90.)
The amp numbers bore out with the stop watch. As the amps dropped the time increased for the SOC to increase by 10%. Initially 10% gains could be recorded in under 1 hour while towards the end almost 1.5 hours.
Note: I turn off my inverter when I have the Genset or shore power on. Not sure if the Victron knows to do this on its own but just to be safe I do this.
Battery Monitor

Battery Monitor
The complete Antares Victron installation includes the Mutliplus charger/inverter, the VE.net panel, a solar charge controller and the battery monitor. The latter is a small blue box located behind the electric breaker panel. There are a few dip switches which should be set at the factory to your battery type (worth checking). After that I have not touched the box. Its job is to measure the batteries and send its data to the VE.net. Almost like in the old PC days, it is the box and the VE.net the monitor.
Solar Controller

MPPT Solar Charge controller
Solar panels are still a bit of a mystery for me. Firstly, my controller requires a reboot once in a while. I hope to get this fixed in Fort Lauderdale in 2 weeks. Secondly, the system does not offer much insight as to how much energy it is producing. I will see if I can add some meters to the system. But to the system’s credit, it works without the need to press buttons. If it is sunny, it will charge the batteries. The solar controller is just like the charge controller on the engine alternator and the Victron charger. It senses the battery state and only sends the right amount of energy. The rest gets sent away in heat. The particular model has MPPT(Maximum Power Point Tracking) which I am told is key to handle sunny days.
Final Thoughts
This post makes the boat seem complex. And it is. But it is set up in a forgiving way, so it will not burn down if I forget a step. We have been very happy with the set-up so far. Other owners have added a wind generator. We are waiting to better understand our usage. I would be tempted to buy more powerful solar panels, but I will wait until the controller issue is cleared up. I plan to research possibilities for power produced while towing, since I turn the genset on the most during long sailing passages. However, any purchase is a while off.
Would I get higher-tech batteries? Not yet. I do not mind going forward and adding a bit of distilled water and I enjoy that lead acid batteries they are bullet proof and easy to replace. I do read articles on the amazing power of lithium ion but I will wait for the that technology to improve.


")